
Showing posts with label pearls. Show all posts

Wednesday, April 9, 2025

A NATURAL PROGRESSION

I've been collecting plaster busts for a while, so it was a natural progression to acquire a mannequin--or two.   They complete the bust mania.

My latest mannequin was a gift from an artist friend.  She had used it in one of her art installations and decided that it was time to pass it on.  She had painted it gold.  How perfect.  I added a Tory birch scarf to make her a little less risque, then added way too many pearls and sparkle from my jewelry stash. Of course I stole a cowboy hat from my husband to top her off.  I think the hat needed some sparkle so my necklace was perfect.   Here she is in a corner of the bedroom.


I think you've already seen the androgynous mannequin in my family room.

ANDROGYNOUS MANNEQUIN IN MY FAMILY ROOM


I decided to include my plaster busts in this post too.  

PLASTER BUST IN MY DINING ROOM


They're even in my bathroom linen closet.
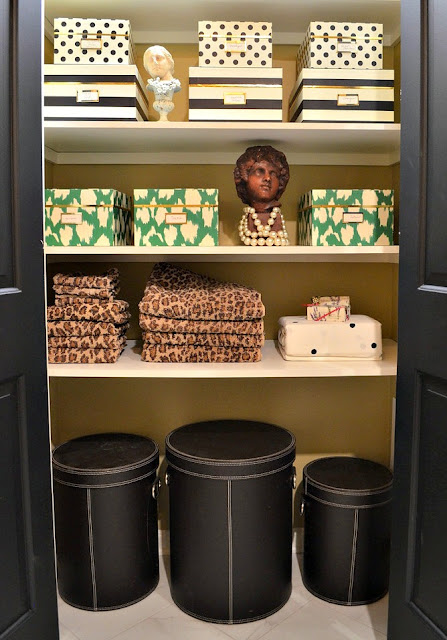
BUSTS IN MY MASTER BATH LINEN CLOSET

This next bust rests on my Dorothy Draper dresser in my foyer.  I wrapped some strands of pearls around the Santos bust.

BUST IN MY FOYER

Who buys a book just for its cover?  Of course I did.  This bust is located atop the coffee table book on the bottom shelf of the foyer table.  Image is from my Instagram feed.  (link to my Instagram page at the end of this post.)

BUST RESTING ON SCHUMACHER COFFEE TABLE BOOK

Same bust, different location.  Also from Instagram feed.

SAME BUST ON MIRRORED TABLE

This is the origin of the plaster bust obsession.  That plaster profile in the corner of my corner cupboard was made by my grandfather.  It started this whole craze I guess.

PLASTER PROFILE CREATED BY MY GRANDPA

What is your obsession?

To see the blog posts related to the images, just click on the highlighted words or image and you'll be directed to the blog post.


ACCESSORIES DON'T JUST FILL A SPACE, THEY DEFINE IT.


If you'd like to get a notification each time I post here, go to the Follow.It button in the left side bar on the blog web version and follow the prompts.

I've been posting on Instagram @allaboutvignettes and on Facebook All About Vignettes.  I'd love for you to follow me there too.

Saturday, December 4, 2021

MY HOLIDAY TREES

I've been thinking about my holiday decor.  I decided to reminisce a bit by viewing all my holiday trees on my blog posts from 2012 to the present.  Each year I seem to do something different.   

 I just had to share.  If you'd like to see the full post for any of the images, click on the image or the caption to be directed there.

2020  MY CHINOISERIE TREE

In 2019 I decorated a stair garland instead of a tree.

2019  ALL YOU NEED IS A GARLAND

 This 2018 tree is my favorite.

2018  MY KATE SPADE INSPIRED TREE

This image became our 2017 holiday card.

2017  MY FLORENTINE HOLIDAY TREE

2016 FUR, FEATHERS AND PEARLS

In 2015 I used my disco balls and silver spheres as a tree skirt.  I never put them away after the holiday.  They've been rolling around the house since then.

2015 DISCO BALL TREE SKIRT AND SILVER

You know that I don't like red.  This is the only time I had a red tree.  I think it was because I loved these plaid suitcases and just had to do it.

2014 PAISLEY AND PLAID HOLIDAY

In 2013 some peacock feathers were my inspiration.

2013 PEACOCK FEATHER INSPIRATION

It was all about leopard prints and coppery ornaments in 2012.

2012 LEOPARD PRINTS AND COPPER

Do you have a favorite?

I'm not sure what I'll do this year.  I just wanted to mention again that if you're interested in seeing the full post , click on the image or caption and you'll be directed there.

Saturday, May 22, 2021

ALTERED SPINES

Before I start this post I wanted to let you know that if you follow my blog with Feedburner and like receiving an e-mail notification when I post, you"ll need to follow me with Bloglovn' instead.  Blogger/Google has deleted the Feedburner notification feature.  You can find the link to Bloglovn' on the side bar on my blog web page, or click on this link to sign up for e-mail notifications :  Bloglovn' 

Thanks.  Now, on to altered spines---on books that is.

Sometimes I'm inspired to do some creative project.  Several years ago I did just that.  I found some books that were the same height and covered them with wrapping paper, much like we did in high school with our text books.  I lined them up and decoupaged images to the spines.  The link to the blog post with the tutorial is at the end of this post.  Check it out if you feel inspired.


You know how much I love orange.  I used orange wrapping paper for these books.  The elephant is a copy of a vintage cardboard children's animal toy.  They're on the bottom shelf of my favorite bamboo side table.

ELEPHANT ON BOOK SPINES


This image of coral was from a calendar of sea life images.  I used the pages from this calendar to create a gallery wall in my daughter's apartment.

CORAL IMAGE ON BOOKS


I collect architectural prints/book plates.  I made copies from my originals and added them to books.  Currently, these books are on the brass and chrome bookshelves in my family room.

ARCHITECTURAL PRINT OF BUILDINGS WITH A SANTOS BOOKEND


This is another copy of an architectural print sandwiched between vintage faux marble bookends.

ARCHITECTURAL PRINTS BETWEEN VINTAGE FAUX MARBLE BOOKENDS


I don't know what this "building" was used for, but it's the perfect size for this image of a clock face.

IMAGE OF A CLOCK FACE INSIDE A "BUILDING"

If you'd like to see the tutorial on how I created new spines, go here.

ENJOYED THIS POST? 
 Sign up to receive a notification every time I publish by clicking here.

Saturday, July 18, 2020

STARTING MY COLLECTED/CURATED TV GALLERY WALL


Recently I wrote about some inspiration for my TV gallery wall.  I think I've decided the direction I want to take to create a gallery wall around the television in my family room.   Artwork and interesting collectibles will be part of the design.  Vintage bookplates will be the art and I'll mix in some favorite objects from my home to add interest and dimension.  I'll unify the gallery wall by using all black frames and by adding some green to break up the black and white. 

I always buy vintage bookplates whenever I see them.  FYI, these plates were originally artwork inside antique books.  Many are very detailed and often hand-colored.   I purchased several nature-themed ones.  Here are a few of them unframed and mounted inside a mat.

HAND-COLORED BOOKPLATES

They fit perfectly into standard size frames.  

MATTED AND FRAMED BOOKPLATE

  I wanted the framed bookplate art to be part of a collected/curated gallery wall around the TV.   I was hoping to distract from that huge black rectangle with some smaller black rectangles filled with art.   This is just the start of the gallery wall.  I began on the left side and selected two of the framed prints,  a green demijohn filled with branches from the yard, and this wonderful vintage mannequin.  I use a vintage MCM buffet for a TV stand.  It's one of my favorite purchases.  You  can get a hint of the size of the TV beast.


THE BEGINNINGS OF MY GALLERY WALL

You can see the demijohn better in this next image.  The vintage MCM chair is one of a pair.  When I purchased them they were covered in red vinyl.  I saw their good bones and had them re-covered in a nubby green fabric.  I love the curved back and the covered buttons.

DEMIJOHN WITH BRANCHES FROM MY YARD
VINTAGE MCM CHAIR AND BUFFET

What do you think about placing a larger print above a smaller one?  I really like this up-side-down look and like it even better when there's a graduated vertical row of art with the smallest on the bottom.

STACKED FRAMED BOOKPLATE PRINTS

A closer look at one of the framed bookplates.

A CLOSER LOOK AT ONE OF THE BOOKPLATES

A CLOSER LOOK AT THE OTHER PRINT

I love this vintage mannequin.  Of course I added a snakeskin scarf and some jewelry.

VINTAGE MANNEQUIN


You'll have to check back as I continue to fill in around the TV.  I'm not sure if I'm going to put the art above the TV as well as on either side.  I also need to find some more non-art to give the wall a collected/curated look.

How do you hide your TV?  Or, help it blend in.

If you missed my previous post with my TV gallery wall inspirations images, go here.

Saturday, May 4, 2019

HOW I ORGANIZED MY LINEN CLOSET

If you've been following along you know we renovated our master bath.  One of my best additions was a linen closet in that room.   The previous closet was large and exploding with toiletries, soaps, mis-matched towels and first aid supplies.  There were items in the back that I had forgotten I owned.  I was determined that this new closet was going to be totally organized.

We added the linen closet in the space next to the shower.   I removed the brass knobs from the doors, painted the double doors black, and added some sparkly oversized knobs to the center of the doors.

LOOKING IN FROM BEDROOM
The linen closet doors are identical to the pair of doors at the entrance to the master bedroom.   I left those doors white and kept the brass knobs on them.  If I ever find another pair of those wonderful large knobs, I'll definitely change the brass ones.  Don't miss my acanthus pendant light.


OVERSIZED KNOB
It took me a while to sort out the old linen closet.  I only kept what I needed and was able to store like items in boxes.  You'll recognize those Kate Spade boxes.
They were under my Christmas tree last year.

INSIDE MY ORGANIZED CLOSET
I only kept two sets of sheets.  This sheet set is waiting its turn on the bed.  They're also Kate Spade.  I'm sure you saw the polka dots.  I always keep some lavender soaps on hand.  The packaging is so pretty and I enjoy the hint of lavender when I open the doors.

SOAPS AND SHEETS
I only kept the leopard towel sets.  The rest of the towels were donated.  I just don't know why I had so many towels.  We have just enough now.  The tubs with lids hold all my bathroom bulk purchases.
TUBS AND TOWELS
Of course I had to add something that has nothing to do with a linen closet.  I have been accumulating quite a few plaster busts. They add some fun and the unexpected to the space.
 They always wear my jewelry.

BEJEWELED PLASTER BUSTS


I must confess that there is a top shelf which I didn't share.  It has extra blankets and pillows.
It's very neat but not pretty enough.

Have you gotten the Marie Kondo bug?  

Saturday, April 6, 2019

SHABBY CHIC TO OOH LA LA: BEFORE AND AFTER OF MY BATHROOM VANITY

This Fall we totally renovated our 1970's time warp master bathroom.  At some point I'm going to share a before and after, but for now I've been showing snippets of the completed room.  You saw some of it in a previous post about the dog in the room.  I named our new pet Monica.  Monica actually is one of my business partners.  She's usually draped in pearls, just like her namesake.  If you missed the dog decor post, go here or click on the image below.   

DOG DECOR IN MY MASTER BATHROOM

One of my hardest and most time consuming choices for the renovation was the vanity.  I didn't start my quest with something vintage in mind, but that's how it ended up when I found a ''shabby chic" vintage dresser.  I had already removed the hardware when I realized that I should take a BEFORE photo.  The hardware was also painted white and was soaking in some Citristrip when I remembered to take the photo.

MY BATHROOM VANITY WHEN I FOUND IT

If you know me, you know that there was only one color choice for the vanity--black.
Here it is in place in our new master bathroom.

LOOKING INTO THE ROOM FROM OUR BEDROOM

I'd never selected granite for a project before.  It was kind of daunting walking around trying to select just the right piece of stone.  When I saw a piece that had black and white with gold speckles, I knew it was the one for the vanity top.  When they installed the top, my first reaction was that it was too busy, but I've come to like it.   I do wish that I had made the splash higher. 

GRANITE COUNTER

Instead of using double sinks, I decided that I wanted a trough sink.  It has become one of my favorite choices for the room.  My fixtures are oil rubbed bronze.

TROUGH SINK AND OIL RUBBED BRONZE FIXTURES

In addition to painting the vanity black, I added a frenchy vibe by outlining the trim on the drawers with a gold cream wax.   It was pretty tedious.  I used blue painters' tape to outline the trim and then rubbed on the wax.  I used Annie Sloan wax in King Gold.  I'm very happy with the result.  Here are some close-ups of my work.  The coverage was a little spotty but I like the imperfectness.


TRIM OUTLINED WITH GOLD WAX

A CLOSE-UP OF THE DRAWERS

 I'm sure you've been noticing that I had the contractor extend the vanity by adding shelves on either side.  He did a great job of implementing my idea to have open shelves with french wire sides.  I added baskets that I already had to the shelves.  It's been wonderful having so much storage and counter space.  I actually feel like we're tidy.

SHELVES WITH BASKETS AND FRENCH WIRE SIDE

There's still more to share about this room.  Make sure you stop back.

If you'd like to see the post about the linen closet in this room, go here.

What do you think about my project so far?

By the way, Monica--my business partner, not the dog--isn't just my friend who's always dripping with pearls.  She also was a huge help in laying out this entire bathroom.  I'm always impressed by how she can walk into a room and have an immediate vision for a space.  If you're looking for some design help you can contact her @GatehouseDesigns.