Sunday, December 23, 2018

MY KATE SPADE- INSPIRED CHRISTMAS TREE

Christmas has been a long time coming to our house.  We've had a one-month renovation that stretched well beyond two months.  I was waiting for all the construction traffic to be gone
 before I put up the tree.  Hence, very late with the decor.  For the first time in forever I don't have a live tree to decorate for Christmas.  I have a small vintage feather tree instead that I placed on the landing in the foyer.  I couldn't wait to add my Kate Spade-inspired ornaments to it.  I knew the black and white with pops of pink would really stand out on the white tree.
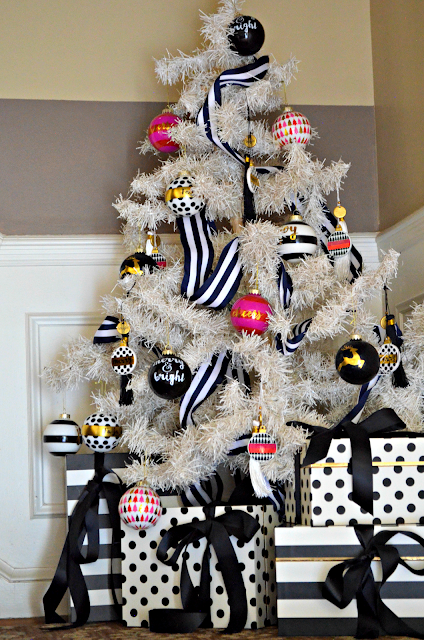

VINTAGE FEATHER TREE

I placed some of my Kate Spade office boxes under the tree.  
Adding ribbon makes them look like gifts.

KATE SPADE "GIFT" BOXES


The striped ribbon that I wove through the tree is very Kate.


I added some tassel ornaments to the mix.


FEATHER TREE DETAIL
Merry Christmas to my readers.  Thanks so much for following along.
See you all next year.  Have a wonderful holiday.

To see last year's tree, go here.

LAST YEAR'S TREE

Wednesday, December 12, 2018

CREATING A WRAPPING PAPER CHRISTMAS TREE


Yes, I made some Christmas trees with wrapping paper.  And yep this is a repeat but it's a good one.
  It's so easy.

My first tree was for my home.   I cut it from some green houndstooth wrapping paper and attached it above the mantel.   I used straight pins to support the garland and added some vintage glass ornaments.  The tree topper is actually a mirror.  (Step by step directions are at the end of the post.)


You can see that I randomly draped the gold garland over the print, around the ibex, and then let it climb the tree.


I crinkled some wired ribbon along the mantel and added a sphere with sparkles.


I liked the idea so much that I re-created it for one of the sales at the store.  This time though I used the plain side of the wrapping paper.  To create the random gold dots I used a round foam stenciling sponge brush.   I dipped it into some gold craft paint and applied it. Make sure to tamp the brush on a paper towel to remove some of the paint before you apply it.  You need the paint a little dry so it doesn't run.   I attached  the "tree" to a chalkboard wall with clear push pins.  I used the same push pins to support the garland.  

PAPER TREE AT THE STORE


The following year I used navy striped paper to make another wrapping paper tree for our Holiday Sale.  This time I layered it on to a vintage cupboard.  I nailed it to the shelves with small finish nails, then draped the garland around the nails and outlined the tree with gold ribbon.

ANOTHER PAPER TREE AT ONE OF OUR SALES

If you'd like to make one, follow the directions below.


1. Decide on the height and cut a piece of wrapping paper  to that length.

2.  On the top of the cut, find the center of the paper.

3.  Draw a line from the center top to the bottom left corner.  ( I used a yard stick.)

4.  Draw a line from the center top to the bottom right corner.

5.  Cut out your tree shape.

6.  I mounted mine with Zots.  You could use double-faced tape, push pins, or finish nails too.

7.  Drape some garland, add ornaments, and a small mirror or ribbon as a topper.

I'd love to see yours if you decide to give it a try.

Monday, December 3, 2018

TRADER JOE'S BOXWOOD WREATHS

For years I created my holiday wreaths with greenery from my garden.  That all went by the wayside when I discovered Trader Joe's boxwood wreaths.  They have become one of my first holiday purchases.  In the past I've placed the wreath on my front door.  I decided to change it up this season and put two wreaths in the front window instead.  


I think I'll be leaving the front door bare.  Maybe.


 Large sugar pine cones and some garden clippings are tucked into the corner of the bench.


I purchased a third wreath and layered it over the architectural piece on the side of the garage.


Do you purchase your holiday greenery or create your own?

FYI, these wreaths arrive at Trader Joe's the day after Thanksgiving and are in limited supply.  I try to get there early.   The other thing I like about them is they're only $10.99!!!!!

Thursday, November 22, 2018

HAPPY THANKSGIVING


Happy Thanksgiving


Monday, November 12, 2018

GATEHOUSE DESIGNS @ BUCKEYSTOWN DESIGN CO-OP

If you've been following my blog, you know that I'm one of four partners at a home decor store, Buckeystown Design Co-Op.  We're four partners with four separate businesses and four different styles.  We all come together and merge our designs to create a  home decor event every Thursday, Friday, and Saturday.  I usually share what I have with you.  I decided to make a change and share what my partner and my friend Monica, owner of Gatehouse Designs, has created.  She balances my boho with her European farmhouse style.  In the foreground of this first image is a sampling of some of the rugs she sells.  In the background you see linens, bedding and pillows in a large European cupboard and on a French day bed.


She always carries a large selection of chandeliers that she displays on a pergola.

CHANDELIERS ON A PERGOLA
Here she is as the centerpiece of her space.

MONICA, OWNER OF GATEHOUSE DESIGNS

New to the store are these coffee tables created from teak root balls.

TEAK ROOT BALL TABLE

Enjoy her holiday decor.


I hope you can join us for our next sale, November 15, 16, and 17. @


If you'd like to follow Monica and Gatehouse Designs:

Link to her Facebook Page:  CLICK HERE  

Or, follow her on Instagram:  @GateHouseDesigns

Wednesday, October 31, 2018

HOLIDAY OPEN HOUSE @ BUCKEYSTOWN DESIGN CO-OP

It's November, so it's time for us to begin the holiday season.  We've been busy these last few days transforming the store for the season.  We'll have holiday decor, of course, but also gifts, stocking stuffers, and hostess gifts.  Mixed in with all of that is our large selection of furniture, lighting, art work, and much more.  So, if you live in the DC metro area please start the season with us.

My space was inspired by a vintage caned day bed.  I only put one of the side rails on so I could fill it with a decorated tree, a vintage champagne crate, and some wonderful velvet pillows.


Love the pillows, but the leopard print pompom garland is my favorite.


Anything caned works for me.  The day bed is so curvy and perfectly chippy.


Nutcrackers are definitely not my thing.  I have a rule that I don't buy anything I don't like for the store.  Well, I broke my rule and the nutcrackers are popping up everywhere.  I'll let you know if rule breaking works or not.


Anything mercury glass works for the holidays.  I have containers, trays, vases,  lamps, and mercury glass ornaments.


The gold sunburst mirrors add another metallic and break up all the silver.  My Santos bust is under a cloche, resting on a stack of books with glitter spines.


I created a whole area with a nod to the characteristic holiday colors:  red and green.
You'd never think of the banana leaf pattern as working for the holidays, but you have to agree that it's the perfect green.


More red and green.  I spy another nutcracker.


Who likes pink?  I do.  Don't miss the goat pillow in the background.


Lately I've been using blue in my decor.  How unique are these ginger jar ornaments with matching Staffordshire dogs!   I'm lazy about decorating trees so I put most of them into a vintage European dough bowl.


I have bottle racks with five or nine bottles.  You can fill them with greenery or just hang a wreath or an ornament from the neck of the bottle.


We just can't skip over Thanksgiving.  Don't miss the gold turkey salt and pepper shakers.


I look forward to seeing everyone soon.
Come share some food and drinks with us while you shop.

BTW, do you like nutcrackers??

Thursday, October 11, 2018

DOROTHY DRAPER AND AN OSTRICH

I've always been attracted to the style of Dorothy Draper and her bold design choices.  My favorite is her Espana dresser manufactured by Baker Furniture.  I don't own an original, but I was able to afford one of the many reproductions of that piece.   For now, it's in my foyer next to the front door.

DOROTHY DRAPER STYLE DRESSER

My ostrich collage art is above the dresser.  
Who knew that an ostrich would look good with this  piece!

OSTRICH COLLAGE


Next to the dresser is a vintage caned-back chair.  I painted the chair black and had it upholstered in vintage English chintz fabric with an architectural print.

VINTAGE CHAIR AND ENGLISH FABRIC

Ring pulls have become my new favorite hardware.

RING PULL HARDWARE

I've already shared that books are one of my most used design elements.  If you missed that post, go here to see how I use books throughout my home.

BOOKS AS A DESIGN ELEMENT

The lamp on the dresser is vintage.  I added fringe to an already pretty wonderful shade. 

VINTAGE LAMP WITH NEW SHADE

The chippy vintage finials move around the house quite a bit.  For now they're very happy resting on the stack of books and wrapped in pearls.

CHIPPY FINIALS WRAPPED IN PEARLS
I have a two-story foyer.   
Whenever I come down the stairs I'm greeted by a little bit of Dorothy Draper.

MY VIEW FROM THE LANDING

Do you have a favorite style or designer?


Go here for some background information about Dorothy Draper, an influential designer
from the early to mid 20th Century.
Go here to see more examples of her Mid Century Modern/Hollywood Regency designs.

ENJOYED THIS POST? 
 Sign up to receive a notification every time I publish by clicking here.