Saturday, August 24, 2019

Garden Architecture

 For the last few weeks I've been re-posting some of my most pinned posts while on my "August recess".  Enjoy this one from 2013.


You know I love my garden, but I like something even more than the blooms----vintage planters, building fragments, spheres, and statuary to embellish my garden design.   These additions add dimension, texture, interest and most of all uniqueness to my landscape.

Have you ever come across old cement planters?  They never rot like wooden planters and when they're in a shady spot they weather with patches of moss and develop a fabulous patina.  I have three matching planters in front of my garage doors.  I usually fill them with flowers, but this year I added some metal topiaries and planted some climbing hydrangeas among the flowers.  They'll need some time to climb to the top, but the support is there for them.

Cement Planters and Metal Topiaries


To the side of the garage, my gargoyle frowns.

My Gargoyle


I have more cement planters in a grouping at the base of my side walkway.  The tall planters are actually chimney pots.  They originally were on roof tops, but they are perfect as tall garden containers.  They're indestructible.  Check out how they're weathering.  My husband wanted to power wash them.  Oh no!!!

Cement Planters and Chimney Pots

I consider my pergola garden architecture too.   I hung a wrought iron candelabra from one of the supports and covered the chain with burlap.

My Pergola Framing the Walkway

I have another chimney pot near the porch.  It's perfect with a fern.

Chimney Pot with Fern


I painted a sphere yellow and suspended it in the tulip magnolia tree.  I have a fern in an urn beside the other side walkway--one of a pair flanking the path.  The garden bench with scrolly iron sides has traveled with me from house to house. 

Sphere, Urn, and Garden Bench
You've already seen my huge iron sphere that is supported by a tall planter in front of the other garage.


 I found this lady statuary and the pagoda at an estate sale near my home.  She was the center of a broken fountain.  They both are cement and very heavy.  I had to be very sure about their location because I was afraid to ask any of my helpers to move them a second time.  My Home Goods sphere is in the foreground.

Lady Statuary, Pagoda, Sphere

This photo is from last year, but I wanted to share the perennials that bloom around my statue.


You've also seen this building fragment before but it's one of my favorite architectural pieces.

Building Fragment in My Garden

This weathered iron bird bath is now a planter.  The architectural piece in the lower right corner is a broken fragment from the lady's fountain.  I scattered the broken fountain base pieces into the garden.

Bird Bath as Planter

We received a sundial as a wedding gift.  I found a cement base to support it.  It's probably part of a bird bath.

My Sundial

Near my screened porch entrance I have a tall lattice obelisk.

Lattice Obelisk

This little squirrel can confuse the real ones in the yard.  He's next to another bird bath.  Have you noticed that I like to scatter rocks in my garden so plants can crop up in their crevices.

Squirrel and Bird Bath

My Buddha bounces around the yard.  Currently he's resting against the pear tree surrounded by a field of liriope.

Buddha

This rusty metal cupola is another favorite.  It's next to a chippy garden chair.  A section of iron fencing is a back drop.

Cupola, Bench, Iron Fence

Hydrangeas are blooming in front of a planter.  To the left is a textured cement orb.


Hydrangea, Orb, Planter

I have a garden arch at the entrance to the walkway to the back yard.  I lost one of the finials and replaced it with an iron bird.  He seems very happy among the trumpet vines.

Iron Bird and Trumpet Vine on My Garden Arch

So, do you decorate your outdoor spaces?   How do you embellish?

Saturday, August 17, 2019

Styling a Bookcase


I guess you've figured out that one of my favorite things to do is arrange vignettes.  I absolutely love combining vintage and new to create a unique look.   And, if you've been following me, you know that I change things frequently to the annoyance of my family.
My latest change up is an old step back cupboard in my kitchen.  I decided to soften it up by painting the inside the same gray that I used on the outside.  The inside was painted a Ralph Lauren red.  It seems harsh to me now.  Here's my before photo.


 It had already been painted so I didn't have to sand first.  I did prime it.  Since the red was so dark,  I used a shellac-based primer called BIN primer by Zinsser. This primer dries in 45 minutes, but if you don't like to clean brushes with chemicals, I suggest you use a small disposable foam roller brush for the big surfaces and a foam paint brush that you can also toss out when you finish.  It covered the red in one coat.  It took two coats of paint.  This is the same paint color I used to paint my kitchen cabinets.  (More about the kitchen later.)  It's Benjamin Moore Rockport Gray. 
I painted the kitchen two years ago and still like the color.

Here's the after.


Here's a close up of the items on the shelves.


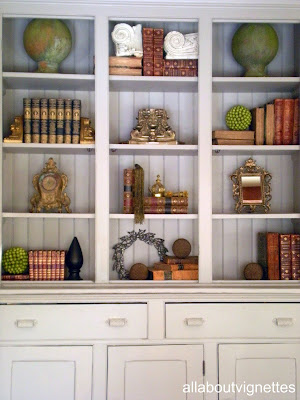
When styling a bookcase, the first thing I obviously do is assemble the items I want to include.  I always select more than I need because not everything will work once you get started.  It's important that the items are similar.  Books always work and are one of the first things I place on the shelves. They can be used as risers and back drops for other items.  An idea to steal is that books don't  have to all be upright.  If you look at the shelves, some are vertical, some on their sides, and those with interesting uneven pages are facing out.
My books are all either old leather books or ones with marbleized covers.   If you're not interested in the hunt, or the expense of vintage books, you can achieve the look a la Restoration Hardware just by covering the books--just like you do with your school books--with paper.


Notice on the second shelf from the bottom they've placed an old dictionary with the pages facing out.  The indentations for the alphabet create an interesting design.

After I place the books, (notice how I interspersed them on the shelves),  I begin placing the larger items.  On the top shelf are two cement garden orbs.  They moved around a bit until they found their place on the top shelf. You need to experiment and move things in different spots,
or if they don't work, take them out of the mix.   
Repetition of like items is another consideration.  Notice that I selected architectural fragments.  They're all different and at the same time blend and serve different purposes.
Some stand alone while others are used as bookends.
Another example of repetition can be seen in the orb shapes.  The garden orbs that I already mentioned, the seed balls, and on the bottom shelf the three French orbs that are made with iron nails and weigh a ton.
 If you look at them  and the rest of the shelves, you'll notice that in addition to similarity of items, you must consider balance and symmetry.
Next I selected interesting items to fill in the other spaces.  Notice though that except for the metal laurel wreath on the bottom shelf, they all have gold tones.  The old clock, the vintage metal mirror, and even the gold boullion fringe draped over the books repeat the gold.  See this repetition of color also in the book spines, the architectural fragment and the crown which is really a Christmas ornament.  In addition to the gold, you can see green, which not only repeats, but adds a pop of color.
I hope you'll give it a try.  It's a bit time consuming, but if you keep in mind Symmetry, Compatibility, Balance, and Repetition, with some juggling, you can do this.
I'd love to see your results.


To see another post with a totally different look about styling a bookcase, go here.

Saturday, August 10, 2019

Umbrella Table to Clock

I'm still on my semi-August recess.  Here's another popular post from 2011.


I've had this very weathered umbrella table under the pergola in my yard for a while. 


We've actually had a few days of warm weather and I started thinking about working outdoors instead of inside.   While I was looking at that table, I decided that it very easily could become a clock.  The first thing I did was to divide it into quadrants and then divide those quadrants evenly for the clock numerals.  I put a piece of 1" painters tape in the 12 locations so the numerals would be equi-distance from the edge.


Pretty shabby table, huh.


Next, I used a purchased stencil to outline the numerals with pencil.  I wanted to be sure of the locations of the numerals before I actually added paint.


Once I had the numerals where I wanted them and checked that I hadn't reversed any I's,V's,or X's, I assembled my stenciling tools.  It's soooo important to use a dry brush. This prevents paint from oozing under the stencil.  I simply dip my brush in the paint then tamp it on a paper towel until it's dry enough to begin. 


Here's the table with the numerals.  I'm not a real think it through planner when it comes to projects.  I just start and then improvise.  My gut told me that I needed something else.


I cut a circle from cardboard, traced around it, then taped it off and used my stencil brush tamping method again to fill in the circle.  Tamping with a dry brush creates a very nice mottled look.


Hmm, still not quite right.  I went looking for my gold craft paint.  I actually found some and decided to add some gold trim around the center circle and the outer edge.
I think I'm done except for sealing my work.  What do you think?


ALL READY FOR DINNER UNDER THE PERGOLA

Saturday, August 3, 2019

My Dilemma with Gallery Walls

Now, gallery walls, my nemesis.

My only experience with a gallery wall was at my daughter's apartment,
and I have to admit that my husband had to rescue me.

Gallery Wall at My Daughter's Apartment

I have since seen some suggestions for gallery walls that appear to be random arrangements rather than perfectly centered and lined up.  I think this is the way to go.

Via


Via
This next arrangement may be a little too symmetrical for me.
What do you think?


This seems easier since there aren't as many frames.


This would help on a stairwell.

Above a table.


I think that someone with my spacial relationship abilities could achieve this diagonal arrangement without measuring.  What do you think?

VIA


How easy would this be?


This next arrangement would involve no nail holes in the wall at all. How many mistake holes do you have hidden behind your artwork?

Suspend rope and move the pictures around as many times as you need to to get it right.
 Suspended links of chain would be even easier.


And for the seriously math challenged (like me) I think these next images are perfect solutions.

Just line up the bottoms of frames.  If the frames are different sizes, all the better.  Even I would be able to draw a straight line with my favorite tool, a four foot level, and line them up.  Or, just lean them on a ledge.

Via

What about a double row.  Feeling challenged?

Via

Same idea, love the addition of the antlers.

Via

If you really want some instructions on arranging your gallery wall,
you'll find some gallery wall cheat sheets here.

There are more examples as well as image sources on my Pinterest page.  Click on this link.

ENJOYED THIS POST? 
 Sign up to receive a notification every time I publish by clicking here.